Thursday 30 January 2014

Clay Animation

For our animation project we made our own clay animations. We observed the popular BBC animated sketch 'Morph'. We used several steps to create our clay animations, which I will explain in this blog.

My Animation: http://www.youtube.com/watch?v=M5WNubPRz0Q

Step 1) Creating the figure

To create the figure we used a ball of clay. We stretched the clay and shaped it into a more human form, similar to morph.  We used white and black clay to create the eyes. We used sharp materials such as pencils and rulers to create the jaw and mould the shape together.


Step 2) Filming with stop motion     

I used a Sony Handycam for filming my clay animation. We used a fireware cable to connect to the iMac's. I used a software called iStopMotion. Each time I had created a frame, I clicked the capture button it recorded the frame. At 12 frams per second. I had made over 60 frames to create 9 seconds of footage. 


------------------------------------------------------------------------------------------------------------------------

Step 4) Adding Sound: 

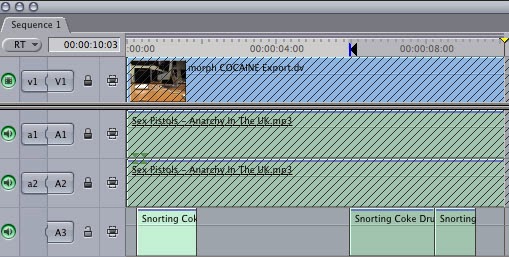
I had added the sound by downloading music and sound effects of youtube. I had open the animation with photoshop and open the music and sound effects in the audio bars.

Step 4) Upload


The final step was to the animation onto youtube. I saved the file into quicktime and imported the file onto youtube.


Thursday 23 January 2014

Cut-Out Animation

Our latest project in level 2 media is animation. Our task was to create a cut-out animation. After finding inspiration from popular shows using this or started out with this technique such as South Park, and Charlie & Lola. We used several steps to create our animation, which I will explain in this blog.

My animation: http://www.youtube.com/watch?v=uzLVdIoF3pM

Step 1: Drawing And Cutting 
Our first step was to draw our illustrations from our storyboards. We used A5 sized paper. If we wanted a part of the drawing to move we would draw it separately. (Example: The Axe I sketched).

The second step was to cut out the images from the paper using scissors.

Our third task was to draw a background using A4 or A5 peices of paper.


Step 2: Filming And Capturing


  1. Our first step was to set up the camera. We used a Sony Handycam. And a copy stand, to support the camera. Then I used a Firewire cable to connect the camera to the mac. 
  2. Our Second task was to open iStopMotion. And open a new file. 
  3. The next task was to capture the movements, of the cut outs. We used the capture button, which was used each time we added a new frame.

Step 3: Editing and Exporting

  1. After using iStopmotion the next task was to export the file onto quicktime and open it on Final Cut Express.
  2. The next task was to add music and audio onto my animation, for this I used a online youtube mp3 converter. And opened the music file in Final cut.
  3. Once the video was edited, I exported into quicktime and then uploaded it onto Youtube.


Thursday 16 January 2014

Stop Motion Animation

We have started a new project in media involving animation, Our task was to create a short stop-motion animation. My animation was a ball falling to the ground. The animation gave the visual of gravity. I took several streps towards making my stop-motion animation, which I will explore in this blog.

My Animation: http://www.youtube.com/watch?v=wrthkOhx5mQ


Step 1: Our first step was to draw an illustration on a A5 piece of paper. I Also numbered the pages so that they were in order.


Step 2: Our second step was to record our flip book pages. For this I used a sony handy cam and a science/copy stand. We set up the camera from a 90 degree bird's eye view angle, I also used a firewire cable to connect the camera to the Mac.


Step 3: Our third task was to open the program 'iStopMotion'. We imported our camera and changed the settings to a 180 degree rotation, so the animation would flip its rotation the right way round. We took a picture for every piece of A5 piece of paper we used. Each picture was used as a frame. at 12 frames a second, we had reach the appropriate speed of animation. I had used 40 piece of paper meaning my animation was over three seconds long.

Once I had finished, I saved my work and exported it into a quicktime file.


Step 4: Our final task was to upload our stop motion animation onto youtube. I had chosen the file and clicked the upload button on youtube. I titled the video 'Ball Bounce (Stop Motion Animation)